| Manufacturer: | Scratch |
 Salvage Operations
Interim Report We recovered this device from a section of hull
plating that had drifted into a long elliptical orbit around the star. It had
pierced the plating but had apparently been so damaged in the process that it
had become inert. Overall, the Macroprobe is about 30cm long. The main fuselage is between 4.4 and 6.5 cm across, and the 'wingspan' is 15-19cm. (The 'wings' are different sizes; like all Borg technology, it is designed for utility, not aesthetics.) A simple reaction engine powers the device. The 'wings' carry reactionless guidance modules. In the front end are the guidance sensors and the drill-like 'probe' containing the nanite injector. Only the flight control systems are functional; everything else has been disabled. We are forwarding the unit, in stasis, to the Daystrom Institute for analysis. Crew chief, Team 28 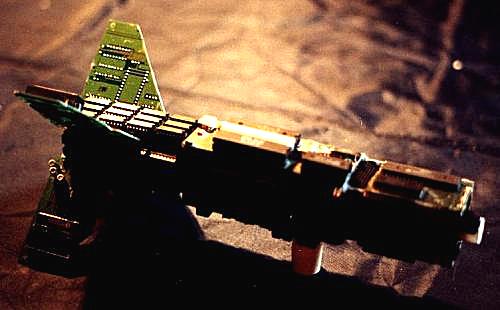
|
- - -
Concept
I didn't just want to use found parts; I wanted to use
found parts to make something that looked as if it were intended to be some
kind of real flying device. Most of my ideas I was more or less unhappy with.
They tended to be flying conversions of non-flying objects, which really wasn't
the concept behind Descon 8.
 Now I've been an on-again
off-again fan of the Star Trek franchise right from the beginning, and have
even done a Borg costume (of a kind) for a masquerade. (See
here) I had a
bit of stuff left over from the project, and some pretty good ideas of how to
make something look Borg, so after a bit of thought I came up with this
idea - making what purports to be a Borg-manufactured rocket out of scrap
circuit boards.
Now I've been an on-again
off-again fan of the Star Trek franchise right from the beginning, and have
even done a Borg costume (of a kind) for a masquerade. (See
here) I had a
bit of stuff left over from the project, and some pretty good ideas of how to
make something look Borg, so after a bit of thought I came up with this
idea - making what purports to be a Borg-manufactured rocket out of scrap
circuit boards.
The instructions will be a bit vague. Unless you used
exactly the same parts I did - and even I don't know what some of them
are - you'll end up having to measure by eye and trim to fit anyway.
Building
I began with the following parts:
- 1 dead AT-form motherboard
- 3 dead network cards
- 1 12" length of BT-50 body tube
- 1 BT-50-size engine block
- 1 Estes engine hook
- 1 24"-diameter parachute, any
- 1 screw eye
- 1 3/16" launch lug
- 24-36" of 1/4" elastic (shock cord)
- 14-count black plastic mesh
- scrap balsa wood for spacers and nose cone block
- odd ICs, plastic nubs and so forth
- bit of duct tape
- slow-set hot glue
That's right; hot glue seems to work fairly well to hold this all together, though it isn't too pretty looking.
- Cut sets of bits from the boards. The four fins were made from the NICs;
the three sets of four body panels were cut from the motherboard. The stuff
isn't fun or easy to cut, and it's difficult to make straight cuts and has to
be ground to make square. But persevere.

- Glue the engine block into the back end of the body tube, recessed 2
1/2". Attach the engine hook so as to have the front end butted against
the block; I got fancy and notched the block so that the hook would nestle in
the notch and the motor would be able to push against the whole block. This may
not be necessary.
- Use the duct tape to hold the front of the hook down. You can wrap around
the tube if you wish; I just used one square piece fitting between the fins.

- Mark body tube and glue fins to it. The fins are set back about 1/2" from the end of the BT to help locate the CP aft.
- Run a second reinforcing fillet of glue along the fin root. Remember that
it will soften the original joint, so be sure things are held in position.

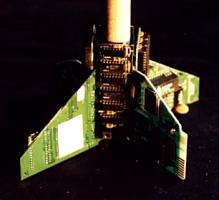
- Attach one set of four body panels between the fins. You may need to trim
away bits of the board to clear components on the fins.

- Assemble and glue four more panels in a square. Slide it over the body
tube. Cut four balsa spacers to fit and glue in between the body tube and the
corners of the square.


- Repeat with the last four, making sure that the end of the body tube is
recessed a bit. Fill any gaps with the plastic canvas to disguise the body
tube.

- Find a spot not too far forward from the leading edge of the fins, one
that stands a bit proud of the rest of the fuselage. Hot-glue the 3/16"
launch lug at this spot. (You don't want it fouling on the rest of the rocket.)
I suppose rail buttons would look better, but I don't have a launch rail yet.

- Carve up a good-fitting block to resemble a standard nose block. You could cut the shoulder off a nose cone, but why waste one? or alternatively you can use a standard nose block if you have one around. Insert the screw eye into the nose block. This passes for your nose cone.
- Add bits to the block to taste and insert in the front end of the body tube.
- Install the shock cord and parachute in your favourite fashion. I still use the classic Estes trifold mount for the shock cord; it's always worked for me. I also put a good snap swivel on all my parachutes.
- Stand back and look at it. There's probably something you can add to make it look even better.
- When you're satisfied, take it outside and fly it!
Design check
Running it through the Barrowman equations (noting ahead of time that the odd shape could only be approximated) indicated that it should be marginally but acceptable stable. It's a real porker, the weight being right up at about 400 grams or more, by far the heaviest rocket I've ever built or flown. A D12-3 works, just barely, but an Aerotech E15 or for preference an E30 would be better. It wasn't in the budget this month, unfortunately, though Advanced Rocketry Group did have them in stock. Launch Report
May 7, 2001: Temp about 12C. Winds light but variable ESE to SSE, gusting to 30 kp/h. Clear.
After cussing out a blown fuse (some grinding discs, like the one I use as a deflector, are conductive) I got the thing to launch. The D12-3 was barely adequate to get it up in the air; it weathercocked quite badly, most likely because end-of-rod velocity was too low. It's draggy, but it's also likely that my scale was reading low and it was even heavier than I thought. Apogee was very low, and as a consequence it hit the ground rather hard, with the chute not properly deployed in time.
(A curious aside: on pressing the Big Red Button I had offered up a small prayer to the Rocket Gods, and had been thinking some about Tyche/Fortuna/Lady Luck. When the Macroprobe came down, it just missed a neighbour's house, and landed on nice damp grass instead of in last year's dry. This is how religions start, I think...)
Despite the hard landing, it stayed together fairly well. Some body panels were sprung, but the fins were still nicely attached to the body tube. Unfortunately, the tube itself was somewhat sprung, so it looks like I'll have to rebuild it around another BT-50 before I fly it again. However, that will have to wait until I get work and can afford an E30-4 or two.Summary
On the whole, I'm pretty pleased with the Macroprobe. It's the first original design I've flown in 25 years, and I think it worked better than I had any right to expect.I'd like to thank Taras at ARG for supplying me with some much needed parts and a bit of patient tolerance as I fretted about motors in the store. And I'd especially like to thank Mishi the Cuddle Cougar, who scored the dead circuit boards from a college I won't name here...

Sponsored Ads


 |
 |